My “Tri-star” AllStar Architecture
Published (updated: ) in Learning Journal. Tags: AllStar.
An Elegant and Flexible Approach
It all started with a ClearNode, a terrific product from Node-Ventures. I highly recommend anyone interested in skipping the hassle and purchasing an AllStar node with a great companion mobile app to pull the trigger on a ClearNode. You won’t regret it.
It wasn’t long before I realized I wanted another. After all, my original use for purchasing it was to take it with me traveling and have access to things like the Papa System no matter where I was. But do I really want to have to take it down each time? Besides, one is none and two is one. So I purchased a second one.
After a crash course from Daniel KD6KHI and Adrian KK6HNG on the inner workings of Asterisk and Supermon, I realized the sweet spot for me was really 3 nodes, so I built a third radio-less node. I hope I can stop… I might have a problem.
Use Case
It all depends on what you want to do. I wanted the ability to have a hub to allow friends and visitors a place to come visit, without giving access to my ClearNodes. I wanted the choice of transmitting or not transmitting local RF by connecting or disconnecting one of my ClearNodes to the radio-less hub. Lastly, I wanted to segregate my conferencing activity with individuals from connecting to and monitoring or transmitting into large systems like Papa. I my mind, that necessitated three nodes, two with RF capability.
Most importantly, I wanted to learn. After all, I had a Raspberry Pi lying around so the whole project was going to cost about $20 for a new SD card and an audio adapter.
The 3 Node TriStar
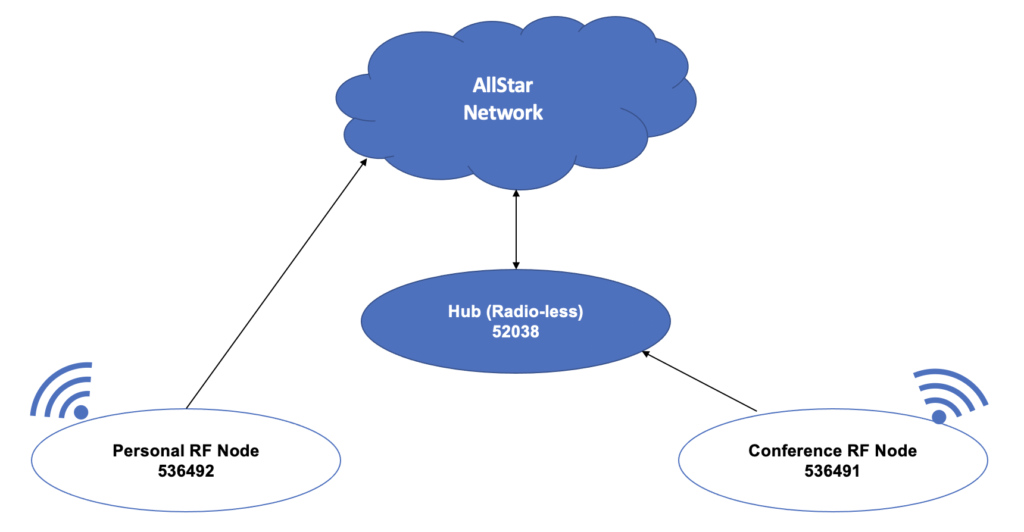
- Radio-less Hub – allows inbound connections and is the advertised location to connect with other hams
- Conference RF Node – the first ClearNode used to connect to the hub, to provide local RF, and to segregate conferencing with other individual hams from connecting to large systems
- Personal RF Node – the second ClearNode used primarily to connect to or monitor large systems and for travel
Obviously each of these nodes can be connected to each other for various purposes, but the layout above is the standard pattern.
The Control Layer
Now managing the ClearNodes is a breeze with the iOS app that comes with them. The Radio-less Hub presents an opportunity to create a master Supermon instance to manage all three nodes (if you make some unsupported configuration changes to your ClearNodes) another added benefit of the additional device.
Additionally, a superb macOS app called Transceive (more on this in a future post) allows you to connect directly into the AllStar network, but relevant here, also allows you to connect directly to your local nodes both to control them and transmit through them. This is ideally suited for the radio-less device.
Acknowledgements
My thinking evolved rapidly on this idea thanks to the kind mentorship of Daniel KD6KHI and Adrian KK6HNG.